

- A small amount of scarlet or red yarn
- A little black yarn for the center
- Optional green yarn for a leaf
- Crochet hook suited to your yarn, often 3.5–4 mm
- Yarn needle and scissors
- Small safety pin or brooch pin
- Optional felt circle, about 1–1.5 inches across, for a firmer backing
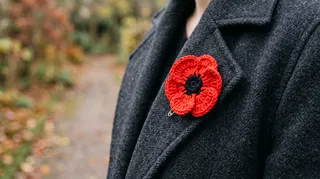
A handmade poppy is a small project with a lot of meaning. This poppy craft guide walks you through crocheting a remembrance poppy with simple stitches, a neat dark center, and a backing that sits comfortably on a coat or bag. You don’t need an elaborate pattern or a basket of specialty supplies; a little red yarn, a hook, and a few careful finishing steps will do.
The design here is intentionally classic: rounded scarlet petals around a black center, with an optional green leaf if you want one. It’s a good make for a quiet afternoon, a remembrance gathering, or a thoughtful handmade gift. I’ll also show you how to adjust the size and attach a pin without letting the flower flop forward.
Before You Start: Yarn, Hook, and a Few Choices
For a wearable poppy, choose a smooth, medium-weight cotton or acrylic yarn. Cotton gives the petals crisp stitch definition and holds its shape well; acrylic is soft and easy to find, though a very springy yarn may make the flower curl. A small amount of black yarn is enough for the center. Green is optional.
Use a hook slightly smaller than the yarn label recommends if your stitches tend to be loose. A firm fabric helps the petals keep their shape and makes the finished flower less floppy. For many medium-weight yarns, a 3.5 mm or 4 mm hook is a sensible starting point, but check the yarn and your own tension rather than treating that size as a rule.
Materials
This poppy craft uses familiar stitches: chain, slip stitch, single crochet, and double crochet. US crochet terms are used below. If you know how to make a magic ring, use it for the center; otherwise, chain 2 and work into the first chain. Either method gives you a compact starting point.
| Choice | What it changes | Best for |
|---|---|---|
| Cotton yarn | Crisp, defined petals | A structured flower |
| Acrylic yarn | Softer feel and easy availability | A quick, comfortable pin |
| Smaller hook | Denser stitches and firmer petals | A poppy that needs to hold its shape |
| Felt backing | More stability behind the flower | A pin worn on a coat or bag |

How to Crochet a Remembrance Poppy, Step by Step
The flower is worked in two parts: a dark center and a ring of red petals. Keep your stitches even, but don’t pull them so tight that the hook becomes difficult to insert. If the center puckers, loosen your tension or use a slightly larger hook for that part.
1. Make the center
With black yarn, make a magic ring, chain 1, and work 8 single crochet stitches into the ring. Pull the ring closed and slip stitch into the first single crochet. Fasten off, leaving a tail long enough to sew the center to the petals.
If you prefer not to use a magic ring, chain 2 and work 8 single crochet stitches into the first chain. The opening may be a little more visible, but the red petals will cover most of it.
2. Crochet the petals
Join red yarn to any stitch around the center. In the same stitch, work a slip stitch, chain 2, 3 double crochet, chain 2, and slip stitch. That forms one rounded petal. Repeat in each of the remaining 7 stitches.
Eight petals make a compact flower with a full, layered look. If you want a smaller poppy, work the petal sequence in every other stitch around a center of 6 single crochet stitches. For a larger flower, use a heavier yarn and a larger hook rather than adding many extra stitches; too many petals can make the edge ruffle.
3. Finish and shape
Fasten off and weave in the red tail on the back. Use the black tail to sew the center securely over the middle of the petals. Arrange the petals with your fingers, spreading them evenly. A light steam from a distance can relax stubborn curls, but don’t press the flower flat. I prefer to shape the petals by hand first; it keeps the stitches looking soft rather than ironed.

Make It Wearable: Backing, Pin, and Small Variations
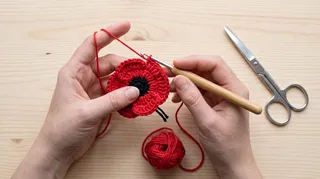
A crochet flower can twist when pinned directly through the stitches, especially if the yarn is soft. A backing solves that. Cut a small felt circle just smaller than the flower, then sew it to the back with matching thread or yarn. Attach a safety pin or brooch pin to the felt, taking care that the pin opens and closes freely.
If you don’t have felt, crochet a small backing circle: make a magic ring, work 6 single crochet stitches into it, then increase to 12 in the next round. Fasten off and sew it behind the flower. This gives the pin a firmer base without adding much bulk.
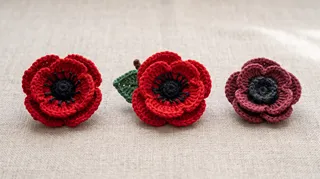
For a leaf, chain 7 in green. Starting in the second chain from the hook, work a slip stitch, single crochet, half double crochet, double crochet, half double crochet, then 3 single crochet stitches in the final chain. Turn and work back along the other side of the chain with half double crochet, single crochet, and slip stitch. Fasten off, leaving a tail to sew the leaf behind one petal.
| Finish | Look and feel | Practical note |
|---|---|---|
| No leaf | Traditional, simple silhouette | Fastest option |
| One green leaf | Adds a small accent | Keep it flat so it doesn’t catch |
| Felt backing | Firm and tidy | Helpful for coats and bags |
| Crocheted backing | All-yarn finish | Slightly softer and thicker |
If you’re making several flowers for a display or group project, it can help to preview how the red, black, and green will sit together before you commit to a larger batch. Homestyler lets you test colors and scale in a room scene, which is handy if the poppies will be part of a remembrance table or seasonal arrangement. The crochet itself stays the star; the preview just helps you plan the setting.

Common Questions and Easy Fixes
Why do my petals curl?
The most common cause is tight tension or a hook that is too small. Try a hook one size larger for the petals, or work the stitches more loosely. A little curl can look natural, but tight spirals usually need a gentler hand.
Why does the flower look wavy?
Too many stitches in each petal or too many petals around the center can create a ruffled edge. Keep the petal sequence consistent and avoid adding extra stitches just to make the flower bigger. Use thicker yarn for more scale.
Can I use leftover yarn?
Absolutely. Small scraps are ideal for this project. Just make sure the red yarn is strong enough to hold its shape and that the center yarn contrasts clearly. A deep charcoal can replace black if that’s what you have.
How do I keep the pin from sagging?
Use a felt or crocheted backing and sew the pin to that layer, not only to the flower stitches. Check that the pin is centered and that the backing is securely attached before wearing it.
How should I store it?
Remove the pin from delicate clothing and store the poppy flat in a small box or fabric pouch. If a petal gets bent, reshape it gently with your fingers. Avoid crushing it under heavier accessories.
A Small Project Worth Taking Your Time With
This poppy craft is quick enough for a beginner-friendly afternoon, but the finishing makes the difference. A compact center, evenly spaced petals, and a secure backing turn a simple crochet flower into something you can wear with confidence. Make the classic red-and-black version first; once you’ve got the rhythm, try a leaf or a slightly deeper red using yarn you already own.
Originally incubated at Autodesk, Homestyler has grown into one of the most widely adopted home design platforms in the world, now trusted by over 20+ million registered users (platform data, 2026). Whether you're a homeowner exploring ideas or a professional designer delivering client-ready renders, Homestyler brings industry-leading 3D technology to your fingertips — no experience required.
If you’re planning a remembrance display, you can also preview the colors and placement in Homestyler before arranging the finished pieces. Then pick up your hook, work one petal at a time, and make a poppy that feels personal.
Projete agora para LIVRE