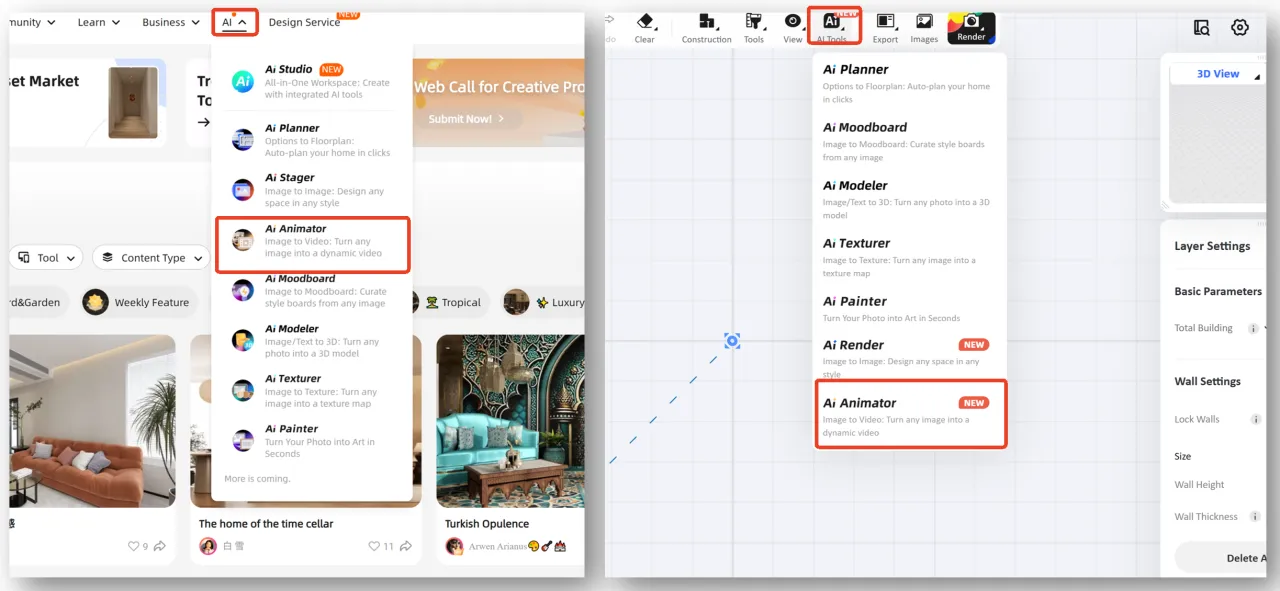
Welcome to the latest breakthrough from Homestyler: AI Animator. ✨
With just a single click, it transforms static images into vivid and engaging dynamic videos. Whether you want to showcase furniture growth, space walkthroughs, or seasonal transitions, AI Animator delivers a cinematic visual experience for you.

AI Animator features 7 built-in animation templates to meet your presentation needs across different scenarios: 👇
Growth Animation: Showcases the dynamic process of furniture generating one by one from scratch.
Build Animation: Simulates the construction evolution from basic structures to final furnishing.
Time-lapse: Captures the shift of light and shadow from day to night in the same space.
Storyboard: Creates cinematic transitions with smooth transitions across multiple angles and scenes for a richer storytelling experience.
And more: Walkthrough, Furniture Display, and Seasonal Shift(best for outdoor scenes).
How to Access
You can quickly access the feature from the following two locations:
Homepage: On the top navigation bar of the homepage, click AI > AI Animator.
3D Tool Interface: You can also find the "AI Animator" button on the top toolbar within the 3D design interface.
Step-by-Step Guide
Method 1: Quick Generation via Preset Templates (Recommended)
Using built-in templates is your best choice if you want to achieve professional results quickly.
Step 1: Select a Template
Choose your preferred template (e.g., Growth Animation) and hover to preview the effect.
Step 2: Upload an Image
Upload the corresponding opening frame or End Frame image. You can upload a local file or select renders from your 3D projects.
⚠️ Note: Renders selected from 3D projects must be 2K resolution or higher.
Step 3: Auto-generate Prompt
The system will automatically generate the best AI prompt once your image is uploaded.
Step 4: Set Aspect Ratio
Choose the video ratio (16:9 / 9:16 / 1:1). Matching the original image ratio is recommended.
Step 5: Choose Resolution
Select the output video resolution (supports 720p or 1080p) based on your needs.
Step 6: Adjust Duration
Drag the slider to set the video duration. If there are no special requirements, using the system default duration is recommended.
Start Generating:
Once set, click "Generate" in the bottom right corner. The process takes about 5 minutes. Afterwards, view and download your video from the Album on the right side.

Method 2: Customized Animation (Advanced Creation)
If you want to achieve more creative and personalized animation effects (e.g., showing a seamless transformation of the same room between different design styles), you can use the Custom Mode.
Step 1: Select the "None" template.
Step 2: Upload the "Opening Frame" and "End Frame" in sequence.
Example: Upload "Minimalist Bedroom" as the opening frame, and "French Retro Bedroom" as the end frame.
⚠️ Important Note: AI Animator does not support images containing real people.
Step 3: Enter prompts. The recommended formula is: [Subject] + [Motion Description] + [Camera/Style Requirements].
Example: A refined bedroom seamlessly transitioning from a modern minimalist style to a vintage French style, camera slowly pushing in.
Steps 4 to 6: Set the video aspect ratio, resolution, and duration, then click "Generate" to create your animated video.

Ready to Create?
Open Homestyler now and start your AI video creation journey! 🚀
AI Animator Credit Consumption
720p: 10 credits / second
1080p: 12 credits / second
💡 Pro-Tip: Subscribing to AI Boost is much more cost-effective!
Get 1,500 credits for just $4.9/month (limited-time offer), plus 10% off additional credit packs and priority processing.